 .
.
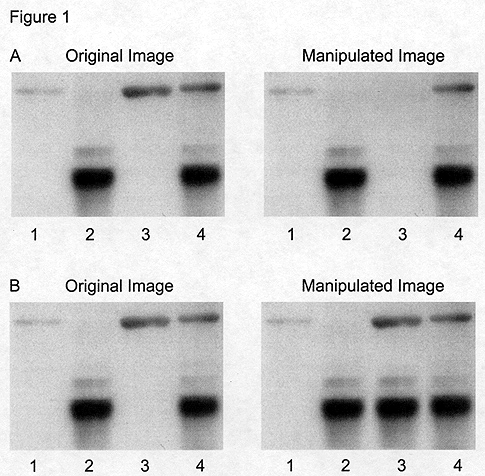
Figure 1: Gross manipulation of blots. A) Example of a band deleted from the original data (lane 3). B) Example of a band added to the original data (lane 3).
| T H E N I H C A T A L Y S T | M A Y – J U N E 2004 |
|
|
|
E T H I C S F O R U MWHAT'S
IN A PICTURE?
|
by Mike Rossner1 |
It’s all so easy with Photoshop®3. In the days before imaging software became so widely available, making adjustments to image data in the darkroom required considerable effort and/or expertise. It is now very simple, and thus tempting, to adjust or modify digital image files. Many such manipulations, however, constitute inappropriate changes to your original data, and making such changes can be classified as scientific misconduct. Skilled editorial staff can spot such manipulations using features in the imaging software, so manipulation is also a risky proposition.
Good science requires reliable data. Consequently, to protect the integrity of research, the scientific community takes strong action against perceived scientific misconduct. In the current definition provided by the U.S. government: "Research misconduct is defined as fabrication, falsification, or plagiarism in proposing, performing, or reviewing research, or in reporting research results." For example, showing a figure in which part of the image was either selectively altered or reconstructed to show something that did not exist originally (for example, adding or modifying a band in a polyacrylamide gel image) can represent falsification or fabrication.
Being accused of misconduct initiates a painful process that can disrupt one’s research and career. To avoid such a situation, it is important to understand where the ethical lines are drawn between acceptable and unacceptable image adjustment.
Here we present some general guidelines for the proper handling of digital image data and provide some specific examples to illustrate pitfalls and inappropriate practices. There are different degrees of severity of a manipulation, depending on whether the alteration deliberately changes the interpretation of the data. That is, creating a result is worse than making weak data look better. Nevertheless, any manipulation that violates these guidelines is a misrepresentation of the original data and is a form of misconduct. All of the examples we will show here have been created by us using Photoshop®; although they may appear bizarre, it is remarkable that they are actually based on real cases of digital manipulation discovered by a careful examination of digital images in a sample of papers submitted (or even accepted) for publication in a journal.
|
|
|
Figure 1: Gross manipulation of blots. A) Example of a band deleted from the original data (lane 3). B) Example of a band added to the original data (lane 3). |
Why
Is It Wrong
To
"Touch Up" Images?
If you misrepresent your data, you are deceiving your colleagues, who expect and assume basic scientific honesty—that is, that each image you present is an accurate representation of what you actually observed. In addition, an image usually carries information beyond the specific point being made. The quality of an image has implications about the care with which it was obtained, and a frequent assumption (though not necessarily true) is that in order to obtain a presentation-quality image, you had to carefully repeat an experiment multiple times.
Manipulating images to make figures more simple and more convincing may also deprive you and your colleagues of seeing other information that is often hidden in a picture or other primary data. Well-known examples include evidence of low quantities of other molecules, variations in the pattern of localization, and interactions or cooperativity.
Journal Guidelines
It is surprising that many journals say little or nothing in their "Instructions to Authors" about which types of digital manipulations are acceptable and which are not. The following journals provide some guidelines, but they vary widely in comprehensiveness.
Molecular and Cellular Biology: "Since the contents of computer-generated images can be manipulated for better clarity, the Publications Board at its May 1992 meeting decreed that a description of the software/hardware used should be put in the figure legend(s)."
Journal of Cell Science: "Image enhancement with computer software is acceptable practice, but there is a danger that it can result in the presentation of quite unrepresentative data as well as in the loss of real and meaningful signals. During manipulation of images, a positive relationship between the original data and the resulting electronic image must be maintained. If a figure has been subjected to significant electronic manipulation, the specific nature of the enhancements must be noted in the legend or in the Materials and Methods."
The Journal of Cell Biology: "No specific feature within an image may be enhanced, obscured, moved, removed, or introduced. The grouping of images from different parts of the same gel, or from different gels, fields, or exposures must be made explicit by the arrangement of the figure (e.g., using dividing lines) and in the text of the figure legend. Adjustments of brightness, contrast, or color balance are acceptable if they are applied to the whole image and as long as they do not obscure or eliminate any information present in the original. Nonlinear adjustments (e.g., changes to gamma settings) must be disclosed in the figure legend."
Because the last set of guidelines is by far the most comprehensive we have found to date (full disclosure: we wrote them), we will continually refer back to them in the following discussions of the use and misuse of digital manipulations.
Blots
and Gels
Gross
Misrepresentation
The simplest examples of inappropriate manipulation are show in Figure 1. Deleting a band from a blot, even if you believe it to be an irrelevant background band, is a misrepresentation of your data (Figure 1A). Similarly, adding a band to a blot, even if you are only covering the fact that you loaded the wrong sample, and you know for sure that such a protein or DNA fragment or RNA is present in your sample, is a misrepresentation of your data. In the example shown in Figure 1B, the additional band in lane 3 has been generated by simply duplicating the band in lane 2.
 |
|
Figure
2:
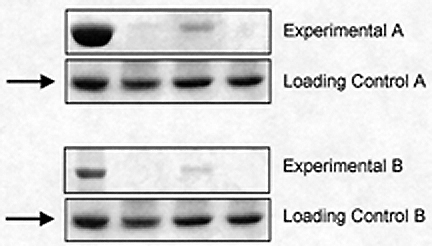
Gross manipulation of blots. Example of a duplicated panel (arrows).
|
Another example of using Photoshop® inappropriately to create data is illustrated in Figure 2, in which a whole single panel has been replicated (arrows) and presented as the loading controls for two separate experiments.
 |
|
Figure
3:
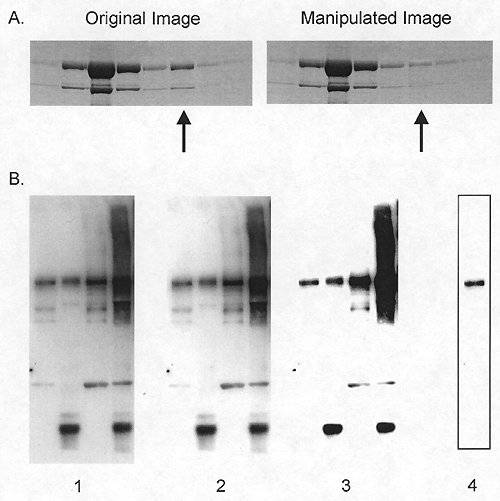
Manipulation of blots: brightness and contrast adjustments. A) Adjusting
the intensity of a single band (arrow). B) Adjustments of contrast. Images
1, 2, and 3 show sequentially more severe adjustments of contrast. Although
the adjustment from 1 to 2 is acceptable because it does not obscure any
of the bands, the adjustment from 2 to 3 is unacceptable because several
bands are eliminated. Cutting out a strip of a blot with the contrast
adjusted provides the false impression of a very clean result (image 4
was derived from a heavily adjusted version of the left lane of image
1). For a more detailed discussion of "gel slicing and dicing,"
see reference 2.
|
More
Subtle Manipulations
Brightness/Contrast
Adjustments.
Adjusting the intensity of a single band in a blot constitutes a violation of
the widely accepted guideline that "No specific feature within an image
may be enhanced, obscured, moved, removed, or introduced." In the manipulated
image in Figure 3A, the arrow indicates a single band whose intensity
was reduced to produce an impression of more regular fractionation. Although
this manipulation may not alter the overall interpretation of the data, it still
constitutes misconduct.
While it is acceptable practice to adjust the overall brightness and contrast of a whole image, such adjustments should "not obscure or eliminate any information present in the original" (Figure 3B). When you scan a blot, no matter how strong the bands, there will invariably be some gray background. While it is technically within the guidelines to adjust the brightness and contrast of a whole image, if you overadjust the contrast so that the background completely drops out (Figure 3B, part 2 vs. part 3), this should raise suspicions among reviewers and editors that other information (especially faint bands) may have dropped out as well.
It may be argued that this guideline is stricter than in the days before Photoshop®, when multiple exposures could be used to perfect the presentation of the data. Perhaps it is, but this is just one of the advantages of the digital age to the reviewer and editor, who can now spot these manipulations when in the past an author would have taken the time to do another exposure. Think about this when you are doing the experiment and perform multiple exposures to get the bands at the density you want, without having to overadjust digitally the brightness and contrast of the scanned image.
 |
|
Figure
4:
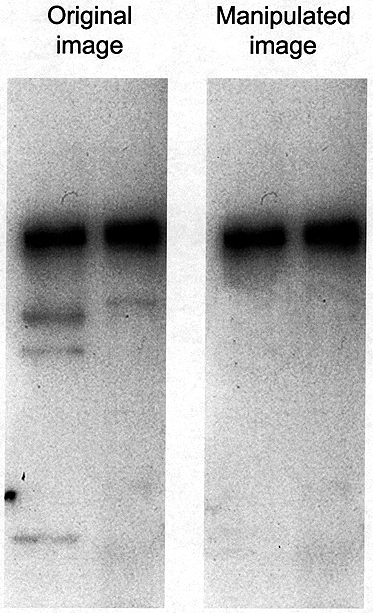
Manipulation of blots: cleaning up background. The Photoshop® "Rubber
Stamp" tool has been used in the manipulated image to clean up the
background in the original data. Close inspection of the image reveals
a repeating pattern in the left lane of the manipulated image, indicating
that such a tool has been used.
|
Cleaning Up Background. It is very tempting to use the tool variously known as "Rubber Stamp" or "Clone Stamp" in Photoshop® to clean up unwanted background in an image (Figure 4). Don’t do it. This kind of manipulation can usually be detected by someone looking carefully at the image file because it leaves telltale signs. Moreover, what may seem to be a background band or contamination may actually be real and biologically important and could be recognized as such by another scientist.
Splicing Lanes Together. It is clearly inappropriate manipulation to take a band from one part of a gel and move it to another part, even if you do not change its size. But it is within usual guidelines to remove a complete lane from a gel and splice the remaining lanes together. This alteration should be clearly indicated, however, by leaving a thin white or black line between the gel pieces that have been juxtaposed. Again, it could be argued that this guideline is stricter than in the days before Photoshop® when paper photographs of a gel were cut up and pieces were glued next to each other. This practice, however, usually left a black line indicating to the reader what had been done.
As it was with gel photographs, it is unacceptable to juxtapose pieces from different gels to compare the levels of proteins or nucleic acids. Rerun all of the samples on the same gel!
Micrographs
Enhancing
a Specific Feature
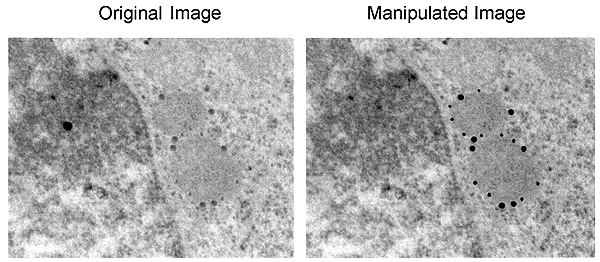
An example of manipulation by enhancement is shown in Figure 5, in which the intensity of the gold particles has been enhanced by manually filling them in with black color using Photoshop®. This type of manipulation misrepresents your original data and is thus misconduct. There are acceptable ways to highlight a feature such as gold particles, which include arrows or pseudocoloring. If pseudocoloring is done with the "Colorize" function of Photoshop®, it does not alter the brightness of individual pixels, but pseudo-coloring should always be disclosed in the figure legend.
Other examples of misconduct include adjusting the brightness of only a specific part of an image or erasing spots. Using the "Brightness" adjustment in Photoshop® is considered to be a linear alteration (see below), which must be made to the entire image.
 |
|
Figure
5:
Misrepresentation of immunogold data. The gold particles, which were actually
present in the original (left), have been enhanced in the manipulated
image (right). Note also that the background dot in the original data
has been removed in the manipulated image.
|
Linear vs. Nonlinear Adjustments
Linear adjustments, such as those for "Brightness" or "Contrast" in Photoshop®, are those in which the same change is made to each pixel according to a linear function. It is acceptable (within limits noted above) to apply linear adjustments to a whole image. There are other adjustments in Photoshop® that can be applied to a whole image, but the same change is not made to each pixel. For example, adjustments of gamma output ("Color Settings" in Photoshop®) alter the intensity of each pixel according to a nonlinear function. Adjustments of "Curves" or "Levels" in Photoshop® alter the tonal range and color balance of an image by adjusting the brightness of only those pixels at particular intensities and colors. Such nonlinear changes are sometimes required to reveal important features of an image; however, the fact that they have been used should be disclosed in the figure legend.
Digitally altering brightness or contrast levels can be misleading with fluorescence micrographs. Some authors mistakenly change the contrast of an experimental compared with a control photo, or change individual panels in a time course, or use different contrast levels when making merged images compared with the original images. All of these changes in individual pictures used for comparisons can be misrepresentations. On the other hand, certain adjustments such as background subtraction or using a filter or digital mask may be needed to extract information accurately from complex images. Reporting the details and logic of such manipulations that are applied to images as a whole should resolve concerns about their use. Standards and guidelines in the field will continue to evolve, but full disclosure will always be the safest course.
 |
|
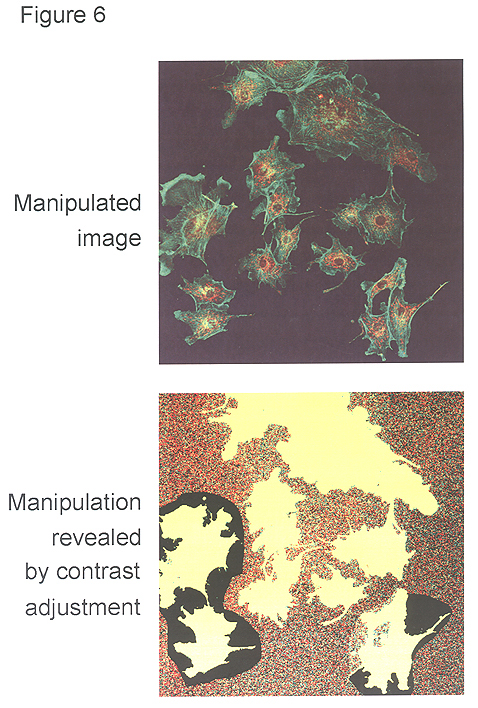
Figure 6: Misrepresentation of image data. Cells from various fields have been juxtaposed in a single image, giving the impression that they were present in the same microscope field. A manipulated panel is shown at the top. The same panel, with the contrast adjusted by us to reveal the manipulation, is shown at the bottom. |
Misrepresentation of a Microscope Field
The reader assumes that a single micrograph presented in a figure represents a single microscope field. Combining images from separate microscope fields into a single micrograph constitutes a misrepresentation of your original data. In the manipulated image in Figure 6 (top panel), cells have been combined from several microscope fields into a single micrograph. This manipulation becomes visible when the contrast of the image is adjusted so that the inserted images become visible (bottom panel). You may want to combine images from several fields into a single micrograph to save space, but this assembly should be clearly indicated by thin lines between the different pieces.
Resolution
A pixel is a square (or dot) of uniform color in an image. The size of a pixel can vary, and the resolution of an image is the number of pixels per unit area. Although resolution is defined by area, it is often described using a linear measurement—dots per inch (dpi). Thus, 300 dpi indicates a resolution of 300 pixels per inch by 300 pixels per inch, which equals 90,000 pixels per square inch (see reference 1).
High-resolution digital cameras (in 2004) can acquire an image that is 6 megapixels in size. This can generate an image of approximately 2400 x 2400 pixels, or 8 inches x 8 inches at 300 dpi. Note that, with the right settings in Photoshop®, physical size and resolution can be traded off against each other without a gain or loss in the amount of information—that is, you can resize an image without altering the total number of pixels.
You should be aware of the resolution at which the image was acquired by the digital camera on your microscope. When that file is opened in Photoshop®, you have the option of setting the size and resolution of the image. You should not set the total number of pixels to be greater than that in the original image; otherwise, the computer must create data for you that were not present in the original, and the resulting image is a misrepresentation of the original data–that is, the dpi of an image can only be increased if the size of the image is reduced proportionately.
It is acceptable to reduce the number of pixels in an image, which may be necessary if you have a large image at high resolution and want to create a small figure out of it. Reducing the resolution of an image is done in Photoshop® by sampling the pixels in an area and creating a new pixel that is an average of the color and brightness of the sampled ones. Although this does alter your original data, you are not creating something that was not there in the first place; you are presenting an average.
Other Data-Management Issues
It is crucially important to keep your original digital or analog data exactly as they were acquired and to record your instrument settings. This primary rule of good scientific practice will allow you or others to return to your original data to see whether any information was lost by the adjustments made to the images. In fact, some journal reviewers or editors request access to such primary data to ensure accuracy.
There are other important issues concerning data handling that we have not addressed by focusing on manipulations of existing data. Examples include selective acquisition of data by adjusting the settings on your microscope or imager, selecting and reporting a very unusual result as being representative of the data, or hiding negative results that may contradict your conclusions. Any type of misrepresentation of experimental data undermines scientific research and should be avoided.
Conclusion
Data must be reported directly, not through a filter based on what you think they "should" illustrate to your audience. For every adjustment that you make to a digital image, it is important to ask yourself, "Is the image that results from this adjustment still an accurate representation of the original data?" If the answer to this question is "no," your actions may be construed as misconduct.
Some adjustments are currently considered to be acceptable (such as pseudocoloring or changes to gamma settings) but should be disclosed to your audience. You should, however, always be able to justify these adjustments as necessary to reveal a feature already present in the original data.
We hope that by listing guidelines and publicizing examples of transgressions, all of us can become more vigilant, particularly in guiding junior colleagues and students away from the tempting dangers of digital manipulation. Just because the tools exist to clean up sloppy work digitally, that is no excuse to do sloppy work.
If you would have redone
an experiment to generate a presentation-quality image in the days before the
digital age, you should probably redo it now. ![]()
References
1. M. Rossner and R. O’Donnell, "The JCB will let your data shine in RGB." J. Cell. Biol. 164:11 (2004)
2. "Gel slicing and dicing: a recipe for disaster." Nat. Cell Biol. 6:275 (2004)
Footnotes
1. The Journal of Cell Biology, Rockefeller University Press, 1114 First Avenue, 3rd Floor, New York, NY 10021. For correspondence: Mike Rossner, phone: 212-327-8881; fax: 212-327-8576; or e-mail
2.Craniofacial Developmental Biology and Regeneration Branch, Building 30, Room 421, NIDCR, NIH, 30 Convent Drive, MSC 4370, Bethesda, MD 20892
3. The general principles presented here apply to the manipulation of images using any powerful image-processing software; however, because of the popularity of Photoshop®, we refer to several specific functions in this application. [Mention of this product does not constitute an endorsement.—ed.]
The authors invite comments on the issues addressed in this article. Please send them to The NIH Catalyst.